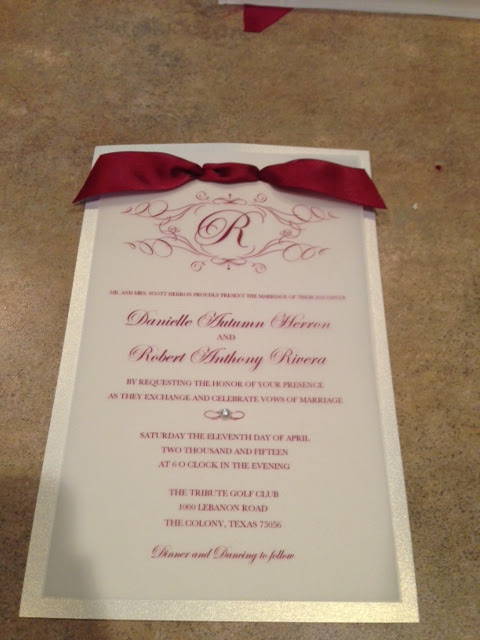
During my wedding planning, one of the things that I was most "sticker shocked" on was how much wedding invitations cost! I looked everywhere (and I'm talking everywhere: Etsy, Michaels, Target, Pinterest, any online shop, etc.) for ones that I liked that were cute, not too elaborate, and at a reasonable price (meaning not $300-600). I mean, it's a sheet of paper, envelope, stamp, and RSVP basically. It wasn't until I found this DIY that I finally had a possibility for what we were wanting to use for our invites, and I think they turned out great (for a DIY).
2 Invites could be made from 1 sheet of paper. I printed the actual invite on Vellum paper, and then put it over the card stock.
Here's what you need:
1 pack of 100 sheet Card Stock Paper-I got mine from Michaels because it was shimmery but not too blingy
1 pack of white vellum paper (I got mine at Staples)
Ribbon in color of your choice
Hole Puncher
Scissors
Half Pearl stickers
Paper cutter (or I just used the one at Staples for free. Or you can have them cut it using their machine but it's not always the best results and it costs money to do so)
Step 2: Once all of the sheets are cut, take a sheet of vellum paper and card stock, and punch 2 holes at the top, about an inch apart. You can see in the pic below how the card stock forms a little border around the smaller sized vellum paper.
Step 3: Thread a piece of ribbon through the 2 holes so you have it threaded on top of the invitation. I had to play with the length of the ribbon to get the right size, but you get the hang of it after a few tries.
Step 4: Taking each side of the ribbon pulled through, you're then going to thread it back around and up into the hole. That sounds super confusing, so watch this video to see exactly how it's done, and in slow motion. Once it was threaded through, I cut the excess ribbon at a slant so it wasn't too floppy or wider than the actual invitation.
Step 5: Place 1 of the pearl stickers as a decorative touch. I only used 1 on the little loop design.
And that's basically it! I found envelopes at Staples to also fit the card stock cut in half. The website also has free templates for the RSVP cards and table numbers if you needed them. I printed the RSVP cards on the same card stock that I used as the backing of the invite. Shout out to the staff at Staples that dealt with me day after day trying to get these cards sized correctly! I think they also have a template for a menu, if you really want to go all matchy matchy.
While they aren't the fanciest of invites, they matched our color scheme perfectly and they were a lot of fun to make. Also only spent around $50 for all, instead of the average $300 I'd been seeing everywhere. They do take some time to do, but once you get the hang of threading the ribbon to make the bow, you get a little assembly line going pretty fast.
Also, please excuse the poor lighting and quality of my iPhone :)


Oh wow, I love it, it looks really classy!
ReplyDelete